webpack是现在很热门的一个前端构建工具,采取了模块化的解决方案,把前端工程中的一切都当做一个个模块来处理。具体怎么科学的解释这玩意我也说不好,大家关心的是它能用来干啥,本着实用主义的原则,有用就是王道。有的同学可能要问了,我Grunt和Gulp玩的贼溜,还要学这个东西么?我想说的是潮流!潮流你懂么?做前端不就是赶潮流,会用工具,至于原理什么的都是浮云。其实Gulp里有个插件叫gulp-webpack,可以把webpack整合进Gulp中使用,这个以后再研究啦!
先放个官网上的图,说明了webpack的作用—-
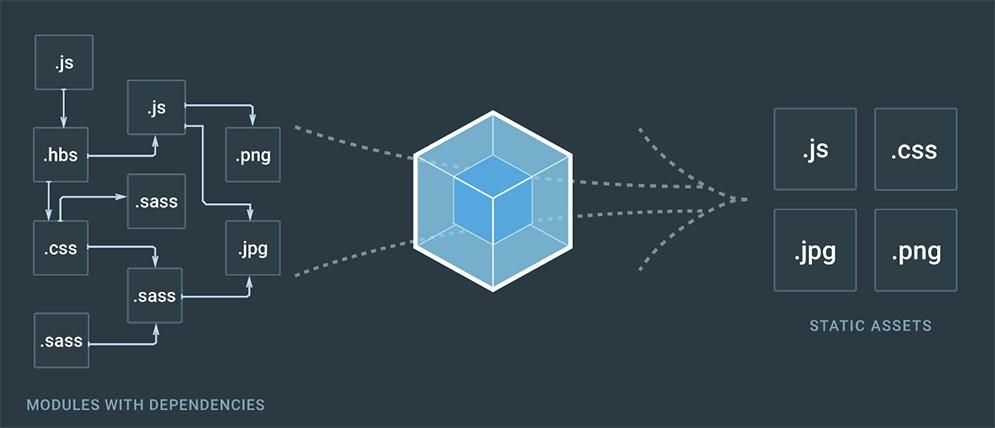
目前webpack官方已经更新到了3,2和3的区别不是很大,但是1和2确是破坏性的更新。大家都懂的,整天跟版本较劲,心有多累~并且大部分网上的教程还停留在1的阶段,于是我使用最新的webpack3,照着1的一篇教程边看官方文档和查资料,爬了半天总算从坑里爬了出来。
创建工作目录
先创建个webpacktest,老规矩npm init,注意工程名不能有大写字母。长话短说,晒一下我一顿操作之后的package.json:
1 2 3 4 5 6 7 8 9 10 11 12 13 14 15 16 17 18 19 20 21 22 23 24 25 26 27 28 29 30 31 32 33 34
| { "name": "webpacktest", "version": "1.0.0", "description": "", "main": "index.js", "scripts": { "start": "webpack-dev-server --port 8080 --progress", "build": "webpack --config ./webpack.production.config.js --progress" }, "author": "", "license": "ISC", "devDependencies": { "autoprefixer": "^7.1.2", "babel-core": "^6.25.0", "babel-loader": "^7.1.1", "babel-plugin-react-transform": "^2.0.2", "babel-preset-es2015": "^6.24.1", "babel-preset-react": "^6.24.1", "css-loader": "^0.28.4", "extract-text-webpack-plugin": "^3.0.0", "html-webpack-plugin": "^2.30.1", "json-loader": "^0.5.7", "open-browser-webpack-plugin": "0.0.5", "postcss-loader": "^2.0.6", "react-transform-hmr": "^1.0.4", "style-loader": "^0.18.2", "webpack": "^3.4.1", "webpack-dev-server": "^2.6.1" }, "dependencies": { "react": "^15.6.1", "react-dom": "^15.6.1" } }
|
这里面的东西我就不解释了,为什么呢,因为这博客又没别人看,自己记一下以后查的时候能想起来就行。
搞一批测试文件
今天主要是一个测试的环境,不是很正规,意思到了就行。
首先新建个app文件夹,这里面放的就是没经过处理的,原汁原味的文件,包括如下几个文件。
index.tmpl.html
1 2 3 4 5 6 7 8 9 10 11
| <!DOCTYPE html> <html lang="en"> <head> <meta charset="utf-8"> <title>Webpack Sample Project</title> </head> <body> <div id="root"> </div> </body> </html>
|
main.css
1 2 3 4 5 6 7 8 9 10 11 12 13 14 15 16 17 18 19
| html { box-sizing: border-box; -ms-text-size-adjust: 100%; -webkit-text-size-adjust: 100%; } *, *:before, *:after { box-sizing: inherit; } body { margin: 0; font-family: 'Helvetica Neue', Helvetica, Arial, sans-serif; } h1, h2, h3, h4, h5, h6, p, ul { margin: 0; padding: 0; }
|
greeter.css
1 2 3 4 5 6 7 8 9 10 11 12
| .root{ background-color: #eee; padding: 10px; border: 3px solid #ccc; transform: translateY(50px); } .root2{ background-color: #f00; padding: 10px; border: 3px solid #ccc; transform: translateY(50px); }
|
main.js
1 2 3 4 5 6
| import React from 'react'; import {render} from 'react-dom'; import Greeter from './greeter'; import './main.css'; render(<Greeter />, document.getElementById('root'));
|
greeter.js
1 2 3 4 5 6 7 8 9 10 11 12 13 14
| import React, {Component} from 'react'; import config from './config.json'; import styles from './greeter.css'; class Greeter extends Component{ render(){ return( <div className={styles.root}> {config.greetText} </div> ); } } export default Greeter;
|
config.json
1 2 3
| { "greetText": "This is a greeting from json!" }
|
配置webpack.config.js
接下来就是webpack的配置文件webpack.config.js,大部分地方我都做了注释:
1 2 3 4 5 6 7 8 9 10 11 12 13 14 15 16 17 18 19 20 21 22 23 24 25 26 27 28 29 30 31 32 33 34 35 36 37 38 39 40 41 42 43 44 45 46 47 48 49 50 51 52 53 54 55 56 57 58 59 60 61 62 63 64 65 66
| { var webpack = require('webpack'); var HtmlWebpackPlugin = require('html-webpack-plugin'); var OpenBrowserPlugin = require('open-browser-webpack-plugin'); module.exports = { devtool: "eval-source-map", entry: __dirname + "/app/main.js", output: { path: __dirname + "/public", filename: "bundle.js" }, module: { rules: [ { test: /\.js$/, exclude: /node_modules/, loader: "babel-loader" }, 到生成的js中;module: true可以使css模块化,防止不同模块css类名 相同的问题,importLoaders: 1这个必须写;postcss-loader包含多种 css处理方式,这里用到了autoprefixer,可以自动添加适应不同浏览器 的前缀。*/ { test: /\.css$/, use: [ "style-loader", { loader: "css-loader", options: { modules: true, importLoaders: 1 } }, "postcss-loader" ] } ] }, plugins: [ new webpack.BannerPlugin("Copyright FLying Unicorns inc.npm"), new HtmlWebpackPlugin({ template: __dirname + "/app/index.tmpl.html" }), new webpack.HotModuleReplacementPlugin(), new OpenBrowserPlugin({ url: 'http://localhost:8080' }) ], devServer: { contentBase: "./public", stats: { colors: true }, historyApiFallback: true, inline: true, hot: true } } }
|
babel的配置也可以写在webpack.config.js里面,考虑到配置项较多,也可以在根目录下新建配置文件.babelrc,打包时webpack会自动读取。
.babelrc
1 2 3 4 5 6 7 8 9 10 11 12 13 14
| { "presets": ["es2015", "react"], "env": { "development": { "plugins": [["react-transform",{ "transforms": [{ "transform": "react-transform-hmr", //实现react模块热加载 "imports": ["react"], "locals": ["module"] }] }]] } } }
|
webpack1和2的几点区别
有几点配置webpack1和2是不同的,这也是坑之所在,再次特别说明:
module里面loaders属性现在改为rules;
每种loader必须写全,如style现在要写成style-loader;
有多个loader时原来的链式写法 loader: 'style!css?modules!postcss'现在写成use数组形式,并且每项loader可配置自己的属性。
1里要将json文件模块化需要安装json-loader,还要配置,现在这个模块已经内置了。
devserver的colors属性现在通过stats配置
现在module.exports里面不允许有自定义的属性,1里面配置postcss可以这么写
1 2 3
| postcss: [ require('autoprefixer') ],
|
现在这样会报错,需要新建配置文件postcss.config.js,写法如下
1 2 3 4 5 6 7 8 9
| module.exports = { plugins: { 'autoprefixer': {}, } }
|
还有一种办法是webpack.config.js使用LoaderOptionsPlugin
1 2 3 4 5 6 7 8 9 10 11 12 13 14 15
| module.exports = { plugins: [ new webpack.LoaderOptionsPlugin({ options: { postcss: function(){ return [ require("autoprefixer")({ browsers: ['ie>=8','>1% in CN'] }) ] } } }) ] }
|
配置生产环境webpack.production.config.js
以上适用于开发环境,执行npm start之后会在public文件夹下生成index.html和bundle.js两个文件,css被打包到了js文件中,打开控制台可以看到所有的配置都生效了,修改greeter.js里类名为root2,不用刷新页面可以立刻看到效果。如果是在生产环境下,需要做一些额外的工作,如把css和js代码分开并压缩啊之类的,为了不冲突需要另起一份配置文件webpack.production.config.js,和webpack.config.js相比只有少许改动。
1 2 3 4 5 6 7 8 9 10 11 12 13 14 15 16 17 18 19 20 21 22 23 24 25 26 27 28 29 30 31 32 33 34 35 36 37 38 39 40 41 42 43 44 45
| var webpack = require('webpack'); var HtmlWebpackPlugin = require('html-webpack-plugin'); var ExtractTextPlugin = require('extract-text-webpack-plugin'); module.exports = { entry: __dirname + "/app/main.js", output: { path: __dirname + "/build", filename: "[name]-[hash].js" }, module: { rules: [ { test: /\.js$/, exclude: /node_modules/, loader: "babel-loader" }, { test: /\.css$/, use: ExtractTextPlugin.extract({ fallback: "style-loader", use: [ { loader: "css-loader", options: { module: true, importLoaders: 1 }, }, "postcss-loader" ] }) } ] }, plugins: [ new webpack.BannerPlugin("Copyright FLying Unicorns inc.npm"), new HtmlWebpackPlugin({ template: __dirname + "/app/index.tmpl.html" }), new webpack.optimize.OccurrenceOrderPlugin(), new webpack.optimize.UglifyJsPlugin(), new ExtractTextPlugin("[name]-[hash].css") ] }
|
还有一个坑不得不提,好像是跟系统有关的,我的win10系统每次使用webpack-dev-server启动服务器,后台会同时启动两个进程,ctrl+c之后还要手动关一个,否则再开就是8080端口被占用,也算是以外的惊喜。
坑先爬到这里,webpack还有很多高级的用法,留到以后慢慢摸索。